The Art of Embossing Tools in Realistic Pencil Drawing
Share
If you're into realism in pencil drawing, you’ve likely come across artists who achieve beautifully intricate details like fine hairs, leaf veins, and sharp highlights. Many of these details are achieved with the help of an unsung hero in the artist’s toolkit: the embossing tool. But what exactly is an embossing tool, and how can it help you take your art to the next level?
What is an Embossing Tool?
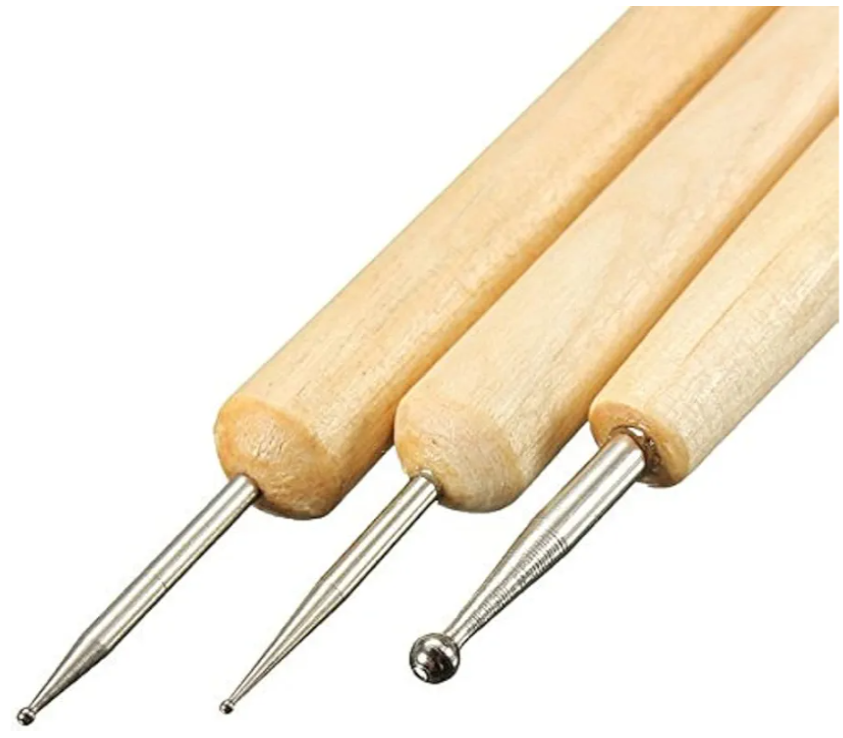
An embossing tool is a simple, pointed metal instrument typically used in crafts and paper crafting to create indents or raised marks on paper or other materials. When bought it is usually in a pack and has multiple different sizes, an embossing tool has a rounded tip that prevents tearing or cutting the surface, allowing you to press lines or textures into your paper or canvas. As mentioned above this tool comes in different sizes and shapes, which can be used to achieve various textures or thicknesses in the indentations.
In drawing, especially when working with pencils, an embossing tool can add amazing highlights and textural effects that would be difficult or even impossible to achieve otherwise.
How to Use an Embossing Tool in Drawing
In drawing, especially realism, the embossing tool is used to create fine, subtle details before any pencil is applied. Have you ever done that exercise before where you get a coin, put some paper over it and then shade the pencil over the top, essentially what you are doing is shading the embossed parts of the paper with a pencil. Well the embossing tool is exactly the same, except this time you are choosing what to emboss and you are embossing with white, instead of pencil. For example, if you're drawing a portrait and want fine, light-colored strands of hair, you would first press the tool lightly over the paper to outline each hair strand. Once you begin shading over the area with pencil, the embossed lines will resist the graphite, staying white or lightly shaded compared to the rest of the drawing. This technique can bring out realistic highlights and textures, making hair, leaves, and feathers look incredibly lifelike.
Another great use for the embossing tool is in drawing intricate textures, like the veins on a leaf. By creating indented patterns in the paper, you can shade over the surface, leaving realistic white lines that follow the veins' natural shape. I've used the embossing tool for all of this and more! My most recent commission I used the embossing tool to create the intricate shapes in somebody's suit.
Positives and Negatives of Using an Embossing Tool
So it's all sounding pretty good so far right? Well let's take a bit of a deeper dive and see what else the embossing tool is good for and maybe not so great for.
Positives
1. Crisp Highlights: Embossing tools allow you to achieve incredibly sharp, white highlights and fine textures that make realistic drawings pop.
2. Perfect for Texture: Whether it's fur, hair, feathers, or other detailed textures, embossing tools help achieve lines and impressions that feel lifelike without overworking the pencil.
3. Depth and Contrast: The resist effect of embossed areas means that they stay white, creating natural contrast and depth, which can be especially effective for dramatic lighting.
Negatives
1. Permanence: Once you’ve embossed an area, the indentation is there to stay, which can be a drawback. Unlike pencils, you can’t erase or modify embossed lines easily, so careful planning is crucial.
2. Learning Curve: Getting the right pressure and mastering embossing techniques requires some practice. Pressing too hard can damage the paper, while pressing too softly might result in barely visible lines. I have ripped paper too many time using one of these tools, it is a small price to pay for the realism you could achieve if done right. That doesn't make it any less frustrating though.
3. Not for Every Style: While embossing is fantastic for realistic textures, it might not fit every drawing style or piece. The raised textures could distract or create unintended effects in some types of shading. Use the embossing tool sparingly, sometimes it may seem easy to get carried away with a tool, but in the long run, your art work is an accumulation of tools, not just one!
Where to Buy an Embossing Tool on a Budget.
If you want to try embossing but don’t want to spend a lot of money on a specialty tool, there are plenty of affordable options available. I live in Perth, Western Australia, so for me I have craft stores like Oxlades, Jackson’s Drawing Supplies which can give me quick and easy access to these tools. However if I was being honest, I pay for the convenience. If you don't live in Australia, I'm sure some craft stores will have what you need. If I want a cheaper option, I choose to go to online platforms like Amazon where I can buy big packs, often for under $10. Look for double-ended styluses, which typically have two different tip sizes, allowing for a bit of variety in the textures you create.
For those looking to save even more, here are some DIY alternatives to professional embossing tools:
DIY Embossing Tools: Affordable Alternatives
1. Inkless Pen: An empty ballpoint pen without ink works perfectly as an embossing tool. It has a smooth tip, great for creating thin, controlled lines. Make sure you empty the ink out completely and try and try again on a practice piece of paper, you do not want to get unwanted ink on a piece of your work!
2. Toothpick: I have never done this personally, but I have had a student who did and they told me it worked fine. For delicate or ultra-fine lines, a toothpick can work well, especially on softer papers. Just remember to be gentle, as it’s easy to press too hard.
3. Mechanical Pencil with No Lead: If you remove the lead from a mechanical pencil, it can double as an embossing tool with a very fine tip. Adjust the pressure for the best results.
4. Blunt Needle or Paper Clip: For thicker lines or textures, a paper clip or a blunt sewing needle can be great choices for creating indented textures. Just be careful about the sharpness, again, broken record, you do not want to rip your paper!
What Can You Draw with an Embossing Tool?
There’s so much you can accomplish with embossing tools in realism drawing. Here are a few classic applications:
1. Hair Strands: For fine, highlighted hairs, embossing tools are unbeatable. Whether it's the fur on an animal or strands of human hair, you can make each strand look more realistic.
2. Veins on Leaves: For botanicals, embossing tools allow you to make precise vein lines that look delicate and natural. It’s a great way to make leaves feel textured and realistic without needing to add heavy shading.
3. Feathers and Fur Textures: Feathers and fine fur can be tricky to render, but embossing allows you to set in fine lines that preserve the paper’s whiteness, giving a fluffy, detailed look.
4. Highlight Reflections on Textures: If you’re drawing something with texture, like fabric or skin, embossing can be used to create subtle highlights or details that don’t overwhelm the drawing but add to the depth.
Final Thoughts
Embossing tools are an incredible asset for artists focused on fine details and realistic effects. While it takes a bit of planning and practice to use these tools effectively, the payoff in detail and depth can make your drawings stand out. Whether you purchase a professional stylus from a local shop like Oxlaeds or Jackson’s, or make your own from an old pen, experimenting with embossing can open up new dimensions in your realism drawing. Try it on your next piece—you might just be surprised by the results!
